
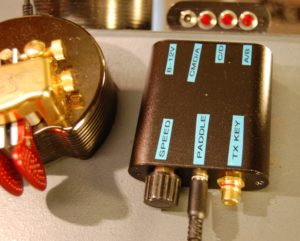
Above you can see the keyer in a small enclosure. At the front are the speed pot, paddle jack and TX output jack. The mirror behind shows three function pushbuttons and the power jack.
The WA5BDU Arduino Keyer is intended to be a simple keyer that can be implemented and operated with a minimum of hardware overhead. At its most minimal, only a paddle would be required. Arduino boards can be had in versions as small as 0.7” x 1.25”, so the physical space requirement is also modest.
The keyer can be controlled by commands sent via the paddle, so a lot of features can be (and are) included despite the small hardware footprint. The plan was to make a simple and physically small keyer that could be built into a homebrew transceiver or transmitter project without adding much to its complexity or size.
As features have inevitably been added, the original vision of a minimalist keyer has been maintained, but now the option of expanding it to a stand-alone unit with traditional controls has been realized.
Ease of use can be increased by adding a speed control pot and one or more pushbuttons as desired.
Features
- Parameters such as speed, sidetone pitch, keyer mode A or B and others can be entered in real time via the paddle. See the “Commands” section of the manual for full information.
- There are four 75 character message memories which can be sent by paddle command or pushbutton. One message can call another.
- The keyer detects a stuck paddle and locks out keying after 255 elements have been sent. Clears when paddle contacts open.
- A hand key mode allows using a straight key or tapping the paddle to send manual Morse.
- Generates a sidetone which can be wired to a miniature speaker or connected into a radio’s audio chain. The pitch is adjustable and the sidetone can be muted by a command sequence.
- Keying logic is iambic with mode A or B selectable.
- Your sending is decoded and sent to the serial port, along with keyer parameter information.
- The keyer has the ability to control a T/R relay. The user can set the time allowed for the relay to close before energizing the transmitter, and the hold time before the relay is allowed to drop out after sending stops.
- A PTT input is available for users who might use the keyer for T/R control and work modes other than CW.
- The Arduino board can be powered by a 5 VDC supply or by 8 to 12 VDC unregulated.
There’s a lot of information to share about operation of the keyer, but I have a PDF manual which does that and a link to it on this page. So do consult the manual to learn more about operating the keyer. Memories, modes, commands sent from the paddle and much more.
Hardware and construction
You could build this keyer with nothing more than an Arduino and it would function, be controllable and key your transceiver. But if you add a few more items it gets easier to operate. Here are a few things you might want:
- An Arduino, possibly an Uno or a Nano or if you want to go really small, a Pro-mini
- A miniature speaker for the sidetone
- An NPN transistor (2N2222 or similar) for keyed line out and another one if you want the keyer to control a T/R relay with time delay
- A speed pot. A 10 kΩ works fine but other values will do too
- Some connectors: A 3.5 mm or 1/4 inch stereo jack for the paddle, RCA for keyed line, dealer’s choice for power in or battery.
- One to three N.O. pushbuttons and two generic small silicon diodes

The schematic shows the required interconnections. The arrangement of the diodes with the pushbuttons is to allow having three PBs using two I/O lines. I really didn’t need to do that since I have plenty of spare I/O lines, but it works fine.
As to the Arduino, a lot depends on the size of the enclosure (if any) you choose. A Nano is ideal in general. The Pro-mini is even more tiny if you want to keep the size small, but it doesn’t have the USB interface so you must have an external dongle (CH340 to serial adapter or equal) to use it. The Uno being larger feels a bit easier to work with and may cost a few dollars more.
A mini-speaker can be handy for times you don’t have a rig providing an external sidetone. An 8 Ω speaker will pull too much current from the Arduino and probably be too loud as well. I put a 200 Ω resistor in series with mine for both of those reasons. You could also use a properly sized capacitor.
The interfacing transistor gives a little isolation between the keyer and the transmitter. A MOSFET of appropriate voltage rating could be used for a cathode keyed transmitter. If RF interference becomes an issue, an opto-isolator can be a good interfacing device. I haven’t had that problem myself.

Above you see my completed keyer along with three styles of Arduino. Smallest at the upper left is the Pro-mini. It has no USB connector so uses the pins at the left to plug into a USB dongle. The Nano right below it is also small but has the USB connector. The UNO is the largest. It has headers already soldered in, a real 3.3 V regulator and a power connector. Any one of these will do the job.
The PDF manual for the keyer is linked below:
And the Arduino source code is here: